FreeNAS AFP Share for Macs
FreeNAS Hosted AFP Share
I have an older Acer netbook laying around that I wanted to turn into a NAS server to host my Time Machine backups for my Macs. I had a similar setup running on a Windows machine in VirtualBox that worked very well. My intentions with the netbook NAS were purely to decrease power consumption.
When trying to recreate my Virtual Box setup on my netbook, I did run into an issue that prevented me from using the AFP FreeNAS share as a valid Time Machine drive. Even though I was able to connect to the share and write files, Time Machine did not like something about the setup.
The steps described below can at least get you to create a valid AFP share that you can use with your Mac machines as a network drive.
Creating a Bootable FreeNAS USB Drive
My netbook does not have an optical drive so I will need to install FreeNAS via a bootable USB.
-
Download the software from FreeNAS. At the time of writing I downloaded version 8.3.1 34-bit disk image. There are 64-bit versions as well, just make sure your system supports it.
-
You will also need Keka or some other unarchiver to extract the disk image from the downloaded file.
-
To extract with Keka, right-click the FreeNAS disk image you downloaded in step 1 and select ‘Open With > Keka’. This process may take a few minutes to extract the disk image. When complete, you will have a .img file.
-
Open Terminal (from Spotlight, or also in the Applications\Utilities directory).
-
From the terminal, type
diskutil listand you should see something like this:
diskutil list
/dev/disk0
   #:                       TYPE NAME                    SIZE       IDENTIFIER
   0:      GUID_partition_scheme                        *500.1 GB   disk0
   1:                        EFI                         209.7 MB   disk0s1
   2:                  Apple_HFS Mac OS X                499.2 GB   disk0s2
   3:                 Apple_Boot Recovery HD             650.0 MB   disk0s3
/dev/disk1
   #:                       TYPE NAME                    SIZE       IDENTIFIER
   0:     FDisk_partition_scheme                        *1.1 GB     disk1
   1:                 DOS_FAT_32 NO NAME                 1.0 GB     disk1s1
-
Unmount the USB drive from the command line,
diskutil unmountDisk /dev/disk1. If successful, you should see the result: Unmount of all volumes on disk1 was successful -
Now it’s time to write the image to the USB drive (
sudoto get elevated privileges, requires root/admin password)sudo dd if=FreeNAS-8.3.1-RELEASE-x64.img of=/dev/disk1 bs=64k. This process will take some time. Once completed, the prompt will return. -
Now you are all set and ready to boot your FreeNAS machine from the USB drive.
Booting into FreeNAS
- At the BIOS screen, press the appropriate keystroke to get the boot menu and then selecting the USB device. You can also change the default boot order in the BIOS setup.
- If you want to change boot order on a Mac, on boot, hold the Option key until you are presented with a list of bootable devices.
-
The system should now boot into FreeNAS.
- After FreeNAS boots and loads, you should be presented with this screen (your IP will be different):
Console setup
-------------
.
1) Configure Network Interfaces
2) Configure Link Aggregation
3) Configure VLAN Interface
4) Configure Default Route
5) Configure Static Routes
6) Configure DNS
7) Reset WebGUI login credentials
8) Reset to factory defaults
9) Shell
10) Reboot
11) Shutdown
.
You may try the following URLs to access the web user interface:
.
http://192.168.1.10/
.
.
Enter an option from 1-11:
- From another machine on the same network as the FreeNAS box, open up the browser and point to the URL shown. You will be able to configure the rest of the NAS from this web interface.
Setting up a Time Machine Volume
-
You will first need to specify a disk to use for your Time Machine backup. The disk should have at least the same capacity as the Mac you will be backing up. In my case, I will be using a 1 TB hard drive.
-
Add the volume from Storage > Volumes
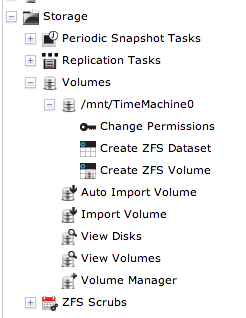
-
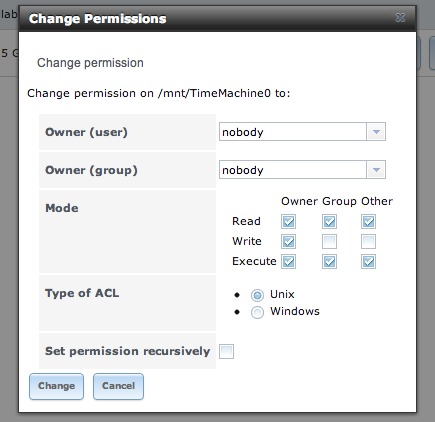
Set the volume permissions, Storage > Volumes > /mnt/TimeMachine0 > Change Permissions. We will set the permissions to
nobodyfor both user and group. The same user, ‘nobody’, will be used when setting up the shared volume.
-
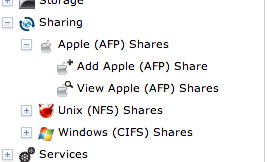
Create an AFP share. Sharing > Apple (AFP) Shares > Add Apple (AFP) Share
-
The following fields were configured for the share:
- Name: TimeMachine
- Path: /mnt/TimeMachine0
- Share/Confirm Password: your password here
- Allow List: nobody
- Read-write List: nobody
- Disk Discovery: checked
- Disk discovery mode: Time Machine
- Database path: /mnt/TimeMachine0
- Enabled .AppleDouble: checked
- AFP3 Unix Privs: checked for Macs with OS X 10.5 or greater Click ok to save.
Connecting to the Time Machine Share
-
From the Finder menu, Go > Connect to Server… Enter
afp://[your free nas ip] -
You will be asked for a password, this will be the password set for the ‘nobody’ user.
-
Once connected, you will then be prompted for the share password you set in the AFP share above.
-
If all worked out, you should be able to connect.
-
Reading and writing files to the drive is fine, but I was getting error ‘OSStatus error 13’ when trying to select the disk in Time Machine setup.
blog comments powered by Disqus